Classic Childrens Illustrations Public Domain Childrens Art Color Pencil
How to illustrate your volume for $0
In a perfect world, y'all'd have a nice clamper of change set aside to hire the perfect illustrator for your project. Or — even better — you'd have a publisher that's willing to invest their money on your book.
But here in the real globe, there are plenty of reasons you might decide not to pay for professional artwork. Perhaps you only don't take the time to look for an illustrator who shares your vision. Or perhaps you're self-publishing something new and experimental, and your budget is down in the single digits.
I was in this state of affairs when I wrote 4 Tales of Cthulhu, my young-reader adaptation of classic H. P. Lovecraft horror stories. The book was a quirky Halloween passion project — a whim with the earning potential of a canned ham. And then I decided to try illustrating it myself.
I quickly ruled out drawing the pictures by mitt, as I lacked both the skill and the time. Instead, I used a combination of free stock art, free prototype filters, and a few simple paradigm editing tricks. I created about forty illustrations.
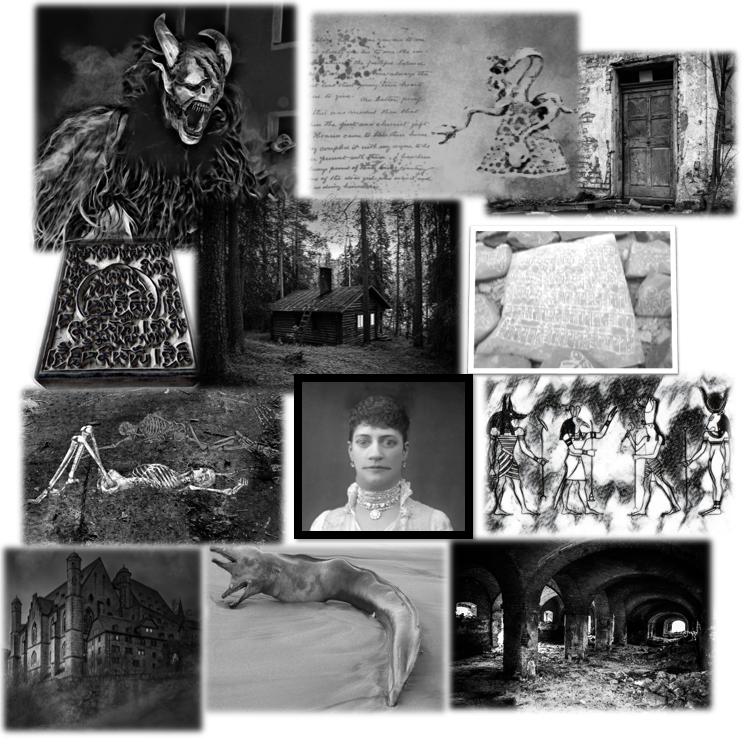
Here'south a sample:
Free pictures: the starting point
The basic recipe for illustration-on-the-cheap is simple: have something gratis and brand it your own.
The expert news is that there are several million free images waiting for you online. You'll find them on sites similar pixabay.com, unsplash.com, and pexels.com. (My personal favorite is pixabay, because it does the best chore with searches that have more than than 1 search word, like "flight woman" or "melting food.") And if that's yet not enough, you can find more than free-picture sources in this commodity.
If costless stock fine art sounds too practiced to be true, well — it really isn't! There are no cached clauses or fine-print conditions designed to trap you lot into a subscription. However, wise writers recommend a fleck of due diligence (also known as covering your barrel). Before you lot utilize a picture, search for copies on the web with a Google paradigm search. If the image turns up in a paid stock fine art catalog or an artist's personal website, information technology could be a stolen photograph that isn't actually in the public domain. A Google image search can also help you identify pictures that are overexposed — ones that are already featured in dozens of other people's piece of work.
Making it your own
Now for the bad news. On its ain, costless stock art isn't enough to illustrate your book.
Here are some of the problems you'll face:
- You lot're sharing with everyone else. If you find something you like, odds are someone else has used it before (and other people will apply information technology in the future). Yous want your volume to stand out as unique and creative, and that effect is chop-chop undermined if your readers spot pictures they've already seen floating around in Facebook posts and Medium stories. This is a particular danger if y'all're using gratis art to create a volume encompass, in which instance you need to enquiry very carefully.
- The pick is vast, merely non limitless. You probably won't find exactly what you want. Although gratuitous fine art sites are stocked with hundreds of thousands of interesting images, they tin't cater to the idiosyncratic details of your story like a professional person illustrator would.
- Photos are not illustrations. Well-nigh of the images you lot'll find are photos or photograph-realistic illustrations. This kind of content suits volume covers and computer games, merely it can be jarring if you employ it for interior illustrations, where readers ordinarily expect artwork that looks "drawn."
- Continuity is hard. If you need ii dozen pictures, you lot can find 2 dozen pictures. Just getting them to have a common aesthetic is more difficult. And if your pictures don't take some stylistic similarities, your volume will experience like a patchwork, and that screams "amateur!"
These challenges exist with paid stock fine art too, they're just more obvious when you use a more limited stock art itemize. Fortunately, you tin deal with all these problems past advisedly and cleverly altering the images you lot find.
Play a trick on #ane: Free art filters
If y'all're illustrating a work of fiction, you probably want your pictures to look like illustrations rather than photographs. There are exceptions to this rule — recollect of the "found" photographs in Miss Peregrine'south Abode for Peculiar Children, for example. Simply illustrations are unremarkably best, because they help create a subtle remove betwixt the reader and the author. Yous fill that gap with the fictional world you've created.
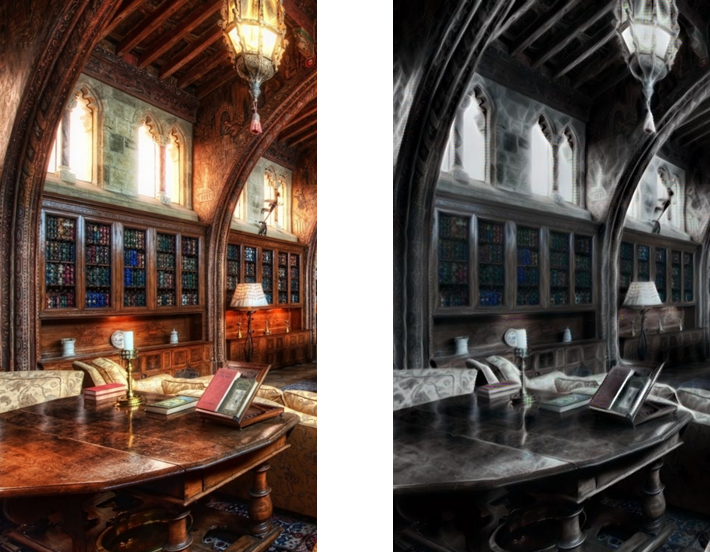
So what makes an image look similar an illustration? Tiny details similar pencil marks, castor strokes, and simplified colors and texture all contribute to the effect. For case, wait at this free picture of a tree through a castle window.
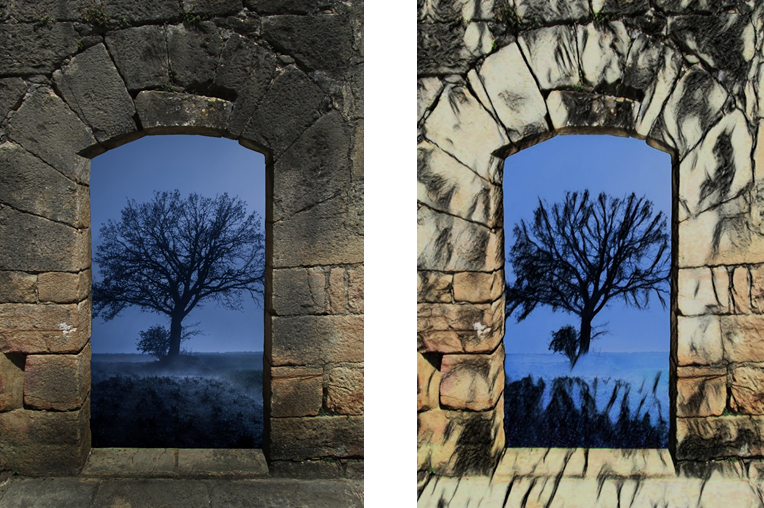
In the original pixabay picture (left), the texture of the stone blocks is clearly real. If you're a photographer, you might fifty-fifty be distracted by the flash lighting reflected on the blocks. Just the filtered version (correct) removes these details, creating a more impressionistic, painting-like result.
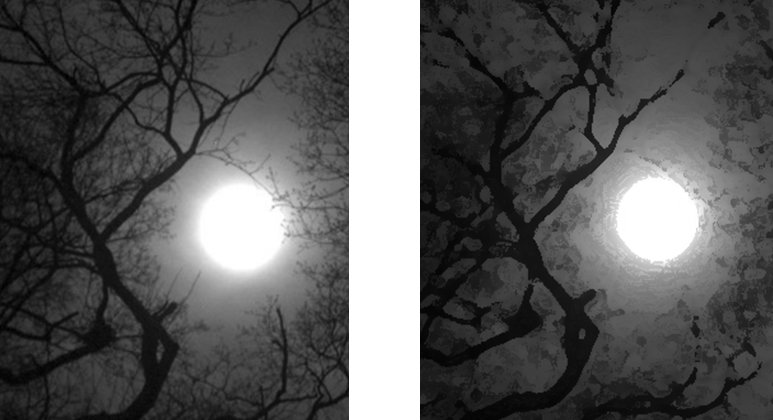
Here's the same effect with a moon:
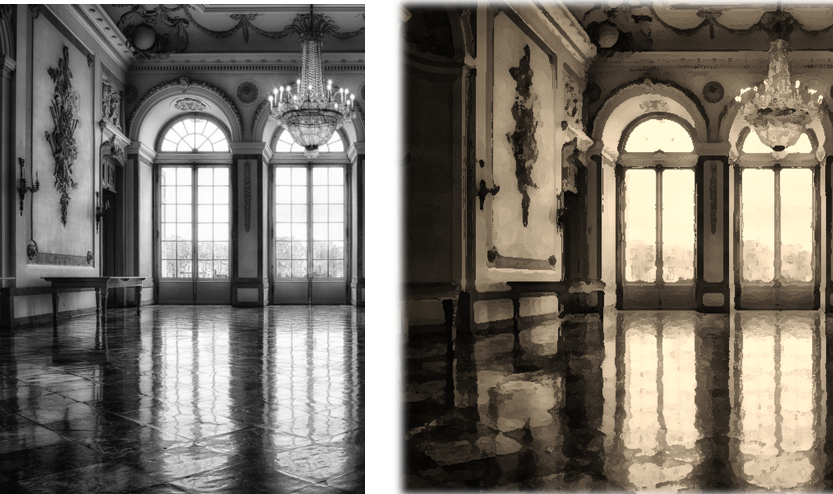
And I used it to turn an empty ballroom into a dream-like vision:
There are several online image editors that can apply these sorts of filters. The best, by far, is LunaPic. Using LunaPic, you tin can upload an image and choose from several dozen art filters, with no registration required. Employ the Scribble, Sketch, Pen & Ink, Pencil, and Sketch2 filters to mimic hand-drawn styles. (All these filters strip the color out of your pictures. If that isn't what you want, y'all tin utilise the color-preserving filters Color Scribble, Color Sketch, Color Pen, and Color Pencil instead.) Once you option a filter, be certain to adjust the intensity down from 100%. Unremarkably, you need just a touch to put your image somewhere between a photo and a drawing.
Art filters don't just make your pictures expect less like photos, they can besides make them look more similar to each other. In my book, I used filters to give pictures a consequent temper of gloom and mystery, which befits H. P. Lovecraft'south supernatural horror. LunaPic has dozens of atmospheric filters, only I relied on the Smoke filter to make transformations like this:
These changes helped to give my pictures thematic unity throughout the book.
(Quick legal annotation: It's perfectly to have costless stock fine art from one of the sites mentioned before, alter it however y'all want, and use it in your work. However, nigh of the sites don't allow you to repost modified pictures, or sell them to other book writers.)
Play a trick on #2: Changing images with the Clone tool
Sometimes you'll notice a perfect moving-picture show on a site like pixabay. Simply more ofttimes you'll find a picture that's tantalizingly close to what you desire, only not quite right.
Oftentimes you can plow a not-quite-correct picture into something more suitable with a little image editing magic. You lot don't need professional person retouching skills for this job, or a pro software tool like Adobe Photoshop. Free tools like GIMP and Paint.NET work but also for essential tweaks. (I use Pigment.NET, only if your computer doesn't run Windows yous'll need GIMP. If you're lucky enough to have an expensive prototype editor like Corel Photograph-PAINT or Adobe Photoshop — the golden standard — utilize that instead.)
One miraculous tool that almost photo-editing programs offer is cloning. Cloning allows you to take one part of your moving picture and "paint" information technology over another function. Y'all cull how large a brush you employ, and how smoothly the new and former content should be composite together.
Cloning comes in handy if you lot need to tidy up your movie by removing details that don't belong. You can quickly paint over text, objects, and even people that shouldn't exist in the frame. Ofttimes cloning can save a film that would otherwise be unusable by removing some disqualifying detail.
You lot can see cloning at work here, removing a person from the background:
Every prototype editing program is a bit unlike, only the cloning tool works in a strikingly similar style in all of them. Here's the breakdown:
- Pick the Clone Postage stamp tool, cull the width of your castor (it'south set at 25 pixels in the instance above), and optionally ready any other settings.
- Selection the area you lot want to copy. In Pigment.NET or GIMP, you do this by holding down the Ctrl fundamental and clicking the correct place on your picture. (In Photoshop, you hold downwards Alt instead of Ctrl.)
- Click somewhere else to copy the selected area. Go along clicking or dragging to paint a larger region. Or, return to step two to pick a slightly unlike area to re-create. (For example, in the person-erasing example you'll demand to grab background from different parts of the photo to properly finish the chore.) Frequently, you'll paint as well much or notice out that source and destination regions aren't quite lined up. When that happens, quickly disengage your mistake (hit Ctrl+Z) and effort over again.
Cloning also lets you repeat and aggrandize elements in your picture. For example, you can turn a modest pile of broken dishes into an epic mess. Cloning also lets you make more substantial changes, if yous get a bit creative. For case, in Four Tales of Cthulhu several pictures use Tibetan letters equally a stand-in for the conflicting Yith language. To create a book in the smashing Yith library, I took a box with a pocket-sized section of Tibetan lettering, and extended information technology to encompass the entire surface:

Here's another example where I took a free stock photo of a dapper old man and, with a dash of cloning and online an art filter, turned him into a reasonable facsimile of an onetime-fashioned wizard:
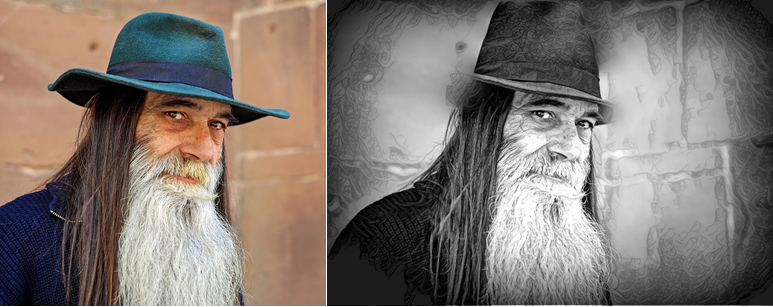
Don't worry besides much about smudges and imperfections in your cloning piece of work. If you're planning to add an art filter, information technology will disguise most minor imperfections.
Trick #three: Cropping and combining pictures
Cloning is a quick and dramatic tool for changing pictures. But you shouldn't overlook more basic changes that can assist make a movie uniquely your ain. Endeavor rotating it, reversing it, or cropping out a small portion. Sites similar pixabay provide generously sized versions of all their pictures, so you'll rarely need to worry even if yous crop downward to small sections. A good rule of thumb is to avert falling in dearest with the original motion picture. You lot'll get a stronger result by focusing on the small details that fit your book.
Sometimes you'll detect free images that take a transparent background. On pixabay, these images are shown in the preview with a checkered background:
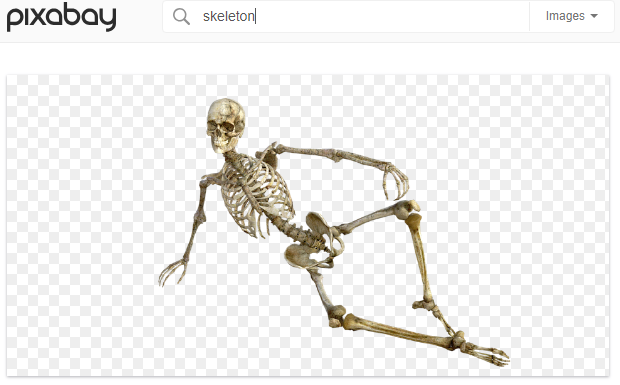
A groundwork-free image is a particularly thoughtful souvenir from an image creator. Yous can driblet it onto another epitome to make a seamless new picture with inappreciably any effort.
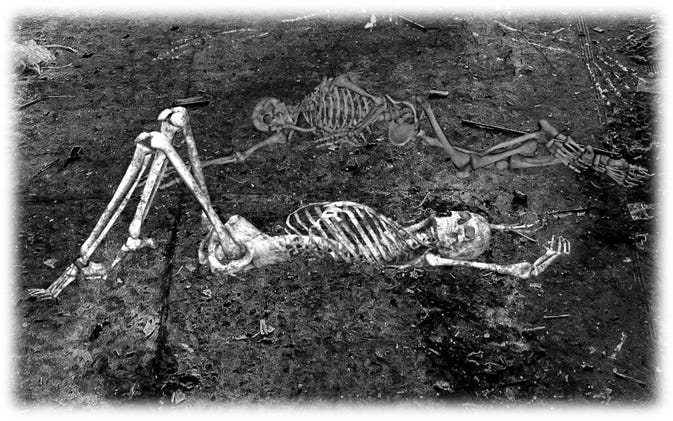
I used it this technique to put a barred grate over a moonlit scene. I also took a couple of groundwork-complimentary skeletons, resized them, and put them on superlative of a small department I cropped from a film of a ruined church hall to create this scene:
If you're new to the world of epitome editing, this procedure may take an afternoon to figure out for the first time. You need to understand how to put each epitome in its own layer, so that you lot can resize each prototype separately. Catch up with a couple of YouTube videos, and you lot'll be ready.
Fox #iv: Changing pictures with elementary warps
One of the secret tricks every epitome editor uses is a warping tool. Warps allow yous to push effectually the shapes and edges in your film. The magic is the way these edits are captivated into your pic. When you lot click and elevate one bespeak, the region effectually shifts and distorts to accommodate your change in a natural style.
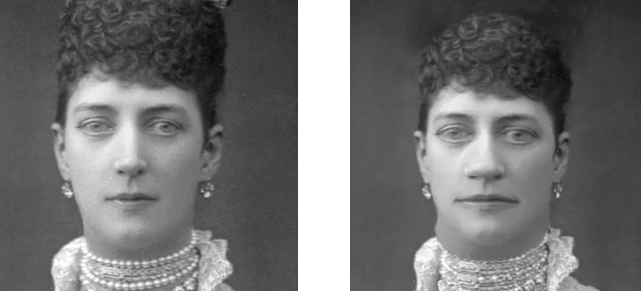
Using a warp is even easier than using the cloning tool. It'southward just a affair of picking a brush size, clicking somewhere on your picture, and gently pushing the pixels to the side. I used the warp tool on an former public domain photo to create the surreal features known in H. P. Lovecraft lore as the "Innsmouth look."
In GIMP, the warping characteristic is called iWarp. In Photoshop it'south called Liquify. In Paint.Net you need to add together a plug-in similar the gratuitous Liquify tool found here.
Warps are often used on people to shrink arms, aggrandize eyes, and brand strikingly sparse models look even more outrageously thin. It's a mutual and wildly pop tool. If yous're not certain how information technology works in your paradigm editor, you'll take no trouble finding a video walkthrough on YouTube.
Hopefully these examples have inspired you to try creating some pictures of your own. You lot might even find that the challenges of using free stock fine art inspires y'all to be more than creative in finding solutions. (Information technology's somewhat like the way that master poets are inspired to be more inventive when faced with the limitations of strict poetic forms.)
I've had the do good of working with a publisher-funded illustrator before, and I can confidently say that none of these techniques will supercede a good creative person. Still, they practise something else. They brand information technology possible to add together illustrations to a projection that wouldn't unremarkably be able to afford them. They make deadline projects — projects that might otherwise never encounter the lite of day — possible.
Happy illustrating!
Source: https://writingcooperative.com/how-to-illustrate-your-book-for-0-e1a5fe89375d
Post a Comment for "Classic Childrens Illustrations Public Domain Childrens Art Color Pencil"